Saturday, January 29, 2011

Of Doll Dresses and Play Tents

Lydia decided that Baby Laura required clothes-notice her Rapunzel hair?

since she had none.

She is so thoughtful.

She is working on a 3rd dress now. Aren't they cute?!! I designed the "ballet slippers" all by myself, since Isabelle pleaded for them. I am happy to report that she likes them.

Meanwhile Babykins was bothering his sisters, so I made him a tent.


He is being a dog


see how he's panting?


Now he's just being cute.


He's having a tense moment


But he recovered quickly.

Bad picture- he looks ill.
Bye-bye!


Wishing you all a beautiful weekend!
Rachael

Wednesday, January 26, 2011

Apron from a Jumper

My sewing students had this clever idea. They took an outdated jumper, cut it off at the sides and shoulder and made an apron out of it.

It's still not done, but we're having fun cuting out shapes and sewing them on. See how I didn't get the pumpkin finished at the bottom?


They added the towel, and all the fabric trim.


It's a little like a halter style, tie-behind- the-neck...


Have a creative day!
Rachael


We Interurrupt this Program to Bring you...

Two cats,

and an Angelina Ballerina Bag.

I know I started Lydia's dress, yesterday, but Elise wanted a bag "like Angelina Ballerina-all purple." So I made up a pattern-

and sewed it together, lickety split.
I cannot tell you how I did, because it is top secret.


Hush, Hush.

I CAN tell you that it took exactly 60 minutes from the first snip of the scissors to the first picture. And she loves it. So do I!!
It's very cute.
(Note: there will be a future post, addressing the plight of the "drowning"doll in picture #4-
just to keep your concern levels down.)
Love,
The ADD Seamstress,
Rachael


Doll Triage

Someone has to give this neglected group of toys a voice.


Take poor Lucy, for instance. She is a Madame Alexander doll. Now a "Sad An Even Sadder" Doll.


She actually looks better. If I had a Magic Eraser she would look close to stunning. I said close.


Madame Alexander would be truly dismayed if she could see the dreadful haircut her doll just had. I wish I would have taken a before picture. It was a curious mix between dreadlocks and corn rows.


Isabelle requested this hairdo. (I say that becaue I would not have chosen it.)


Take poor Becky. She has come a long way since I took her in to my care.


This was the best I could do.


This next gal was from Joanns, and she is now doing well, I'm happy to report.


She's been through extensive therapy. I know this hairdo isn't the best for her, but....


compared to these girls, she's looking OK.

Someone wants to sell these unrecognizable Amercan Girl dolls for $650!!!! Ha! What a joke!Josefina on the far right has had QUITE the haircut. That's Samantha in the middle, and Kit on the left,and the other 2 are Just Like Me dolls- just in case you couldn't tell.... This is sad. I even thought about rescuing them. Yup, for 3 whole seconds the thought filled my mind.


Ya know, they remind me of that story in Little House on the Prairie, when the tornado came through and sucked the neighbor boy up in it and then dropped him out naked.
Sorry, it just does.


But my story doesn't explain poor Josefinas' hair. Hers would somehow have to include a blind man with a butcher knife, I think.


Anyways.


I love dolls.


I love babies.


And after having given birth 4 times to astronomically huge babies of my own....
I love dolls even more. :)

The end.


Love,

Rachael
The Doll Loving Seamstress


Note:This post is meant to be taken with a grain of salt, and yes, I love my children.

Little People

Today I live amongst the Little People.
Sometimes I feel like it's a .....jungle
Other times it's like a fairy tale...I want to ride the palomino horse.
Or live in Miss M's Stately home. The dog barks, the cat meows, and the crickets chirp at night around her mansion.
The doorbell even rings.


I think Miss L's house looks fabulous. You have to admit she has it decked out.
Look! The sun is even shining in the windows!


But best of all.
It's pink.
I love pink.
Enough said.
Wish me well-I'm off to tame the wild beasties in the jungle...
Rachael

Tuesday, January 25, 2011

Colonial Dress for Lydia Part 1

I have Felicity Merriman to blame for this one. (smile) My next project is one I am SO excited about! And it happens to be for this little girl. (Don't mind that little boy- he was just too cute to leave out)
She requested a "Felicity Dress". I chose Simplicity 5042.

She fell in love with this fabric at JOANNS in 2 seconds flat last week. Love at first sight. Period. So I bought it, because I love her.(Here it poses, fresh from the dryer. Always wash fabric before sewing, to ensure that your hard work remains the size you desire after it's made. Alrighty?)

And because it was beautiful. (Now folded-I'm being a good girl-but not good enough to iron it-I seldom do that.)

Well, the ivory eyelet contrast fabric just got deleted. Whoops. so sorry.
Neeeext....

Measure the lovely subject.
1>Measure Bust,
2>Waist,
3>Back Waist (Shown below-her measurement is 13"- can you tell?)
4>Finished Length.(leaving measuring tape at nape of neck, determine how long she wants the finished dress to be. Lydia wanted 47 1/2")
Write it down. Draw a picture if you feel so inspired. :)


I circled the view that I am making on the instructions. (View C. Except I'm not putting that poofy drape on the skirt)


Take out the pattern pieces and cut out the ones that are for dress C. I meant to take a picture of that. I am so sorry. It said to cut pieces 5,6,7,16,17,18,19,20,21,22. But I didn't cut out 22 because it was the drape, remember?!)
Below is the Bodice Front. See the Bust Finished Garment Measurements? Now class, based on Lydia's measurements, which size am I going to choose? If you said SMALL, you're amazing. ;)
I'm going to cry.
Now fold up all the extra pieces perfectly and put them back in the envelope. Yes, I really did this. And they fit perfect.It's just an odd thing about me. I love folding pattern pieces neatly. It does my heart good to know I can overcome the challenge.

Tap, tap tap, ...is anyone out there?

And finally, here is my pile of cut pattern pieces waiting for tomorrow! (You may notice I do not cut my pattern pieces exactly- just cut around them, but there is not right or wrong way. I do that because I usually have to alter a pattern for myself, and prefer to have extra tissue to work with)
This all took me 30 minutes to do, not including the wash/dry time.
So until tomorrow!
Lots of love and Blessings!
Rachael

Monday, January 24, 2011

Isabelle's Pansy Skirt

Here is the Pansy Fabric that was free that became a skirt, and this is the story how....


Isabelle kept bringing it to me, saying "Pwease make me a Pocahontas dress, Mom?"
To which I said,"Can we make a skirt? I think a Pocahontas dress would be brown."
To which she graciously replied, "Alwight."

So, get your sewing machine and scissors out, here goes...


This is the desired result for a sturdy 4 year-old size. I realize this might fit your 6 year-old, so adjust your measurements accordingly!

The skirt has a yoke, a large ruffle, and a small contrasting one.


The yoke was 7 1/8" wide by 38"
The large ruffle 11 1/4"wide by 75"
(That's 2 pieces, each 37" long)
and the ruffle was 7 1/2" wide by 112"
(That's 2 pieces the full 45" of the fabric and a third one that was 22")

Here they are with the side seams sewn together and the ruffle folded over lengthwise, gathered, and pinned in place. (If you don't know how to gather, skip down a little bit)

Be sure the sewing machine is on a basting stitch and baste the gathers down. (Some seamstresses stitch it in place at this point, but I get much neater gathers this way, and I never sew over pins, so this makes that easier. :) I'm weird that way.
This is my little sweetie on her basting stitch.( 2.2 is her regular stitch, by the way)

Here is the ruffle basted on at the lower edge of the basting stitches.


This is what it looked like in action-

Next I serged it. Zigzag here if you don't have one of these amazing, wonderful little honeys.

Topstitch. Please. It looks better.
See?!

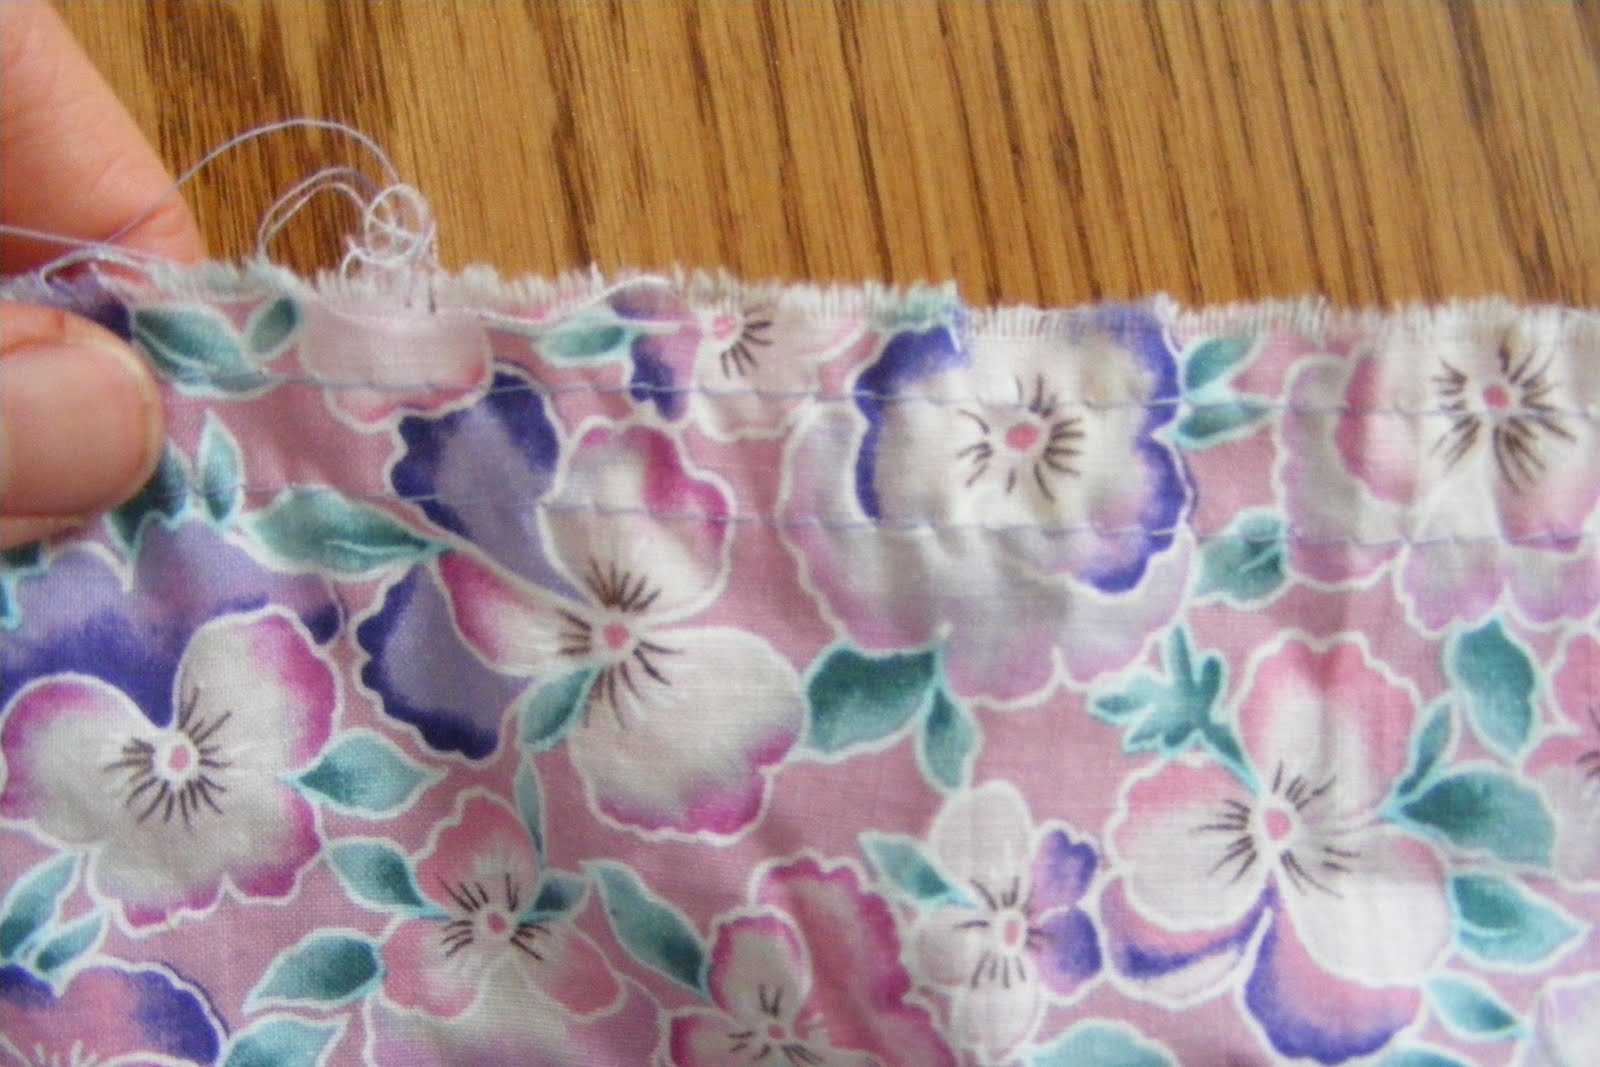
Gather the top edge of your ruffle by sewing with a basting stitch at 5/8 "and 1/4" and separate the threads neatly like this.

Turn the yoke right side out and the ruffle wrong side out. Set the yoke inside the ruffle so that right sides are together. Are we clear?!!! I hope so...
Like this-
Match the side seams and pin them together
Find the centers and pin them together. I had pictures of all this but it was way too much!


Then grab the thread in your fingers like so, and the fabric in your other fingers, and slide it gently along. I have observed that thread breaking comes from jamming the thread along, rather than keeping it moving.

Pin it neatly down, baste it like we did the ruffle, serge or zigzag, and then...
Topstitch!


It should look something like this. Yes?

Fold or iron down a 1 1/4" casing at the top of the yoke(assuming you have 1" elastic)and stitch along the lower and upper edges like this-


Leaving an opening for the elastic
Stick a nice big safety pin through your non-roll elastic (the kind with vertical stitching in it)

Once it's threaded through, and you've tried it in for size, cut it off and pull the ends ou
Zigzag it together about 3 times for safekeeping

And sew the casing opening.... shut. Amen
And now you can see the finished product sideways, because Blogspot was having a bad hair day and wouldn't allow me to rotate this picture. Weirdsmobile.
Moving on.
Loveliness itself. A free skirt, about three hours, and 1 sweet girlie girl in a twirly, twirly skirt.
I Love happy endings!
Happy sewing!
Rachael